Booze Cruising

The Boy and I went on a quick cruise last weekend with some friends.  It was a lot of fun and a nice little getaway.  True to form, The Boy realized about 3 miles from the port that he forgot to pack a bathing suit.  A quick stop at a Walgreens was fruitless, but luckily we picked up two (clearance!) boy-kinis at a nearby department store, and still made it to the boat in plenty of time.  The Boy narrowly escaped sleeping on the lido deck for three nights.

Cruises tend to be pretty affordable, unless you enjoy partaking in the adult beverages (or the gambling), in which case it can get pretty costly.  While I have no advice for avoiding gambling losses, other than to pick black 14 and always double down on 11, I have been very successful with getting alcohol onto several cruise lines (unless you are a cruise line employee, in which case I AM JUST KIDDING and STOP READING NOW). I thought I would share this knowledge, since I was under the impression that this was a common practice, but the two couples we were with did not bring any of their own alcohol on board.

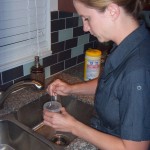
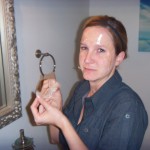
The key is to disguise the alcohol as water or soda.  Obviously clear liquors impersonate water pretty well, and very dark liquors such as Jaeger resemble coke. We went with strictly vodka, since we had plenty on hand, and it mixes with many juices, lemonades, etc. I have had great success using the bottles of water that are attached together. Remove the lid from one in the middle, and pour out the water (or put it in your dog’s bowl, which I did), and refill with your “alternative liquid of choice.”

The vodka only looks different because it is very cold.

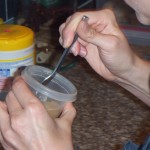
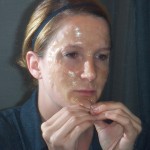
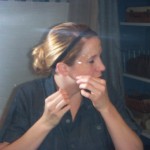
Make sure you line up the fill level accurately.  Then, you will need to super glue the lid to the detached ring.  This can be pretty tricky, because they are all stamped with a date, which you will need to line up perfectly.  Also, you will need to lift up the detached ring so it meets the bottom of the lid while the super glue dries.

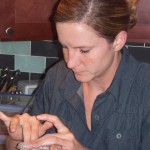
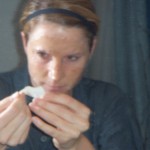
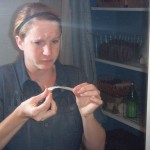
The cardboard didn’t quite do the trick, so we used some knives:

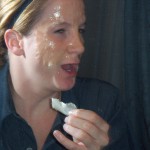
At some point we got sloppy and got some super glue on the stamped-on numbers. You should try to avoid this because it distorts the stamp and is very obvious.  However, a quick remedy is some nail polish remover and a q-tip, which will take off the stamp altogether. Finally, we realized the knives were not working well, so we ditched them for some toothpick things.

This did the trick and allowed the lid and the detached ring to stay pushed together while the glue dried, and then we packed the entire thing in our checked bag.  Another thing we did, but did not photograph, was to buy some of those little Aquapods, which are just smaller rounder water bottles.  They were nice because you could just put the super glue directly onto the detached ring, and screw the lid back on, without having to push the ring up to meet it.  It dried perfectly.  We then put all six bottles back into the plastic shrink-wrap packaging and put it in our carry on.  The guy checked all of the bottles to make sure they were sealed, and that’s it.  Lesson: diversify. Some in your checked bag, some in your carry on.  Be sure to bring your own cup!  I had a plastic water bottle with a lid, and a giant plastic cup with a lid and a straw.  Therefore, we could just order ice and juice to our room, fill up our cups, and head out. Our friends may not admit it, but they were totally jealous!

The Boy and I are such lushes, and shared our stash with our friends, therefore we were running low pretty quickly.  No worries!  We bought more vodka and carried it on the boat at our first port of call (which turned out to be our only port of call thanks to inclement weather).  We simply emptied the entire bottle into my giant cup, and carried it right through security.  It was really that easy.

I am sure “breaking the rules” makes some people nervous, and I can understand that. However, as long as you are over 21, and bringing legal items (obviously) the worst that can happen is that they take it away.

Happy Cruising!

Side effects of the cruise included feeling like we were still rocking on a boat and smelling all contents of water bottles before drinking for several days.  Small price to pay.

Pinbusters – Homemade Biore Strips TAKE 2

Have you ever wondered if the stuff people post on Pinterest is true? Well I have, and I test them all so that you don’t have to, ’cause ain’t nobody got time for that.  Click here to check out all of the pins I haven taken on. You might be surprised by some of the results!

When I first tested the Pin that you could create your own at-home Biore strips using gelatin (click here to read that debacle), I suspected that something was off with my technique. However, I followed every last detail of the tutorial, so I wasn’t sure where I had gone wrong. Thanks to a helpful suggestion from a reader (thanks, Sarah!), I am getting right back on that bike. Or that horse. Or whatever.  I just hope it doesn’t hurt as much this time.

The error of my ways was apparently the fact that I didn’t microwave the gelatin mixture.  Further research has indicated that water and milk work equally well, and I don’t have any milk, so I will be using water.  (Why am I always lacking crucial cooking/baking/woman supplies?  Let’s face it, I am not a woman of the kitchen, I’d prefer to be in the garage, and I do not know we are out of anything until The Boy tells me.  I did not ask him if we had any milk before coming home, and I do not feel like running out to get some for the sole purpose of rubbing it on my face.  If I had a bowl of delicious dry cereal awaiting its dairy dressing – well now that would be a different story.)

Sorry, I can never resist a tangent. I believe the appropriate literary terminology is stream of consciousness, but I refer to it as diarrhea of the brain.  I’m a classy gal.

I assembled my ingredients, and added warm water to one packet of gelatin, mixing well for a few seconds. I then nuked it for 10 seconds, took it out quickly and started stirring. I tried to put it on my face but it was too hot for even my finger. I kept stirring for a few seconds until I could stand the heat, but it still hurt when I rubbed it onto my face. Then I moved to the bathroom and continued applying. The consistency was SO MUCH BETTER. I could actually rub it onto my face, but it was very sticky. Once I got my face covered, I waited. The Dog was very interested in the entire process, but mostly the goo all over my face, and I had to physically restrain her from licking it.  I waited approximately 15 minutes, and then started peeling. (The Boy said I looked like a “peel and eat shrimp” or a guy wearing one of those protective masks for playing basketball.  He is so descriptive.)  We took so many amazing photos that I could not choose only a few.  Therefore, here is the step-by-step photo array of what went down:

Take 2 was way closer to a Biore strip than the last attempt, I will certainly admit that.  As I peeled it away, it felt as though I was pulling my first layer of skin off.  It was unpleasant, but it did mimic the effect of a Biore strip.  I do think the Biore strip is much easier to use, definitely less messy, and works slightly better.  However, for the low low cost of $0.37 ($1.49 / 4), it is absolutely worth it. When I try it again (and I will), I will do two things:  (1) apply only to my “problem areas” and (2) avoid hair (eyebrows and hair line) at all costs. AT ALL COSTS.

Crafting Fail – Fixed!

If at first you don’t succeed … throw that crap away! That was my motto, anyways. The Boy won’t let me though. Boooooo, Boy.

Awhile back I made a soap dispenser out of a fantastic old jar I found at a thrift store. I used my diamond drill bit to put a (way too large) hole in the top, and used super glue to attach a cheap pump.

A few months later, and she isn’t looking so hot anymore.

All that pumping and moisture (get your minds out of the gutter!) have caused the super glue to lose its grip, and the metal pump started rusting at the bottom.

I cleaned the pump and the top of the jar with some steel wool I have left over from the wood stain Pinbuster, and it worked great.

The Boy had picked up some clear silicone adhesive, which I think will work much better and hopefully prevent some of the rusting. I put a small bead in a circle approximately where the pump sits, and put it back into place.

After wiping off the excess silicone, and letting it dry for about 30 minutes, she was good as new and back in place. So if at first you don’t succeed, ignore the problem until The Boy comes home with a solution. That’s my new motto.